
When it comes to cocktail esoterica, ice may be one of the most important (and overlooked) aspects of home cocktail making.
So let's talk ice. In later postings I'll dig into professional-grade gear and how it can help you match that $15 cocktail experience of a world class bar at home at huge savings. High-end tools can make a difference but using good ingredients is most important. Using the right ice for the job is crucial.
So let's talk ice. In later postings I'll dig into professional-grade gear and how it can help you match that $15 cocktail experience of a world class bar at home at huge savings. High-end tools can make a difference but using good ingredients is most important. Using the right ice for the job is crucial.
A large cube of any clarity will melt slower and keep your drink colder longer than regular sized cubes. When mixing (or shaking) it's important to have different sized pieces of ice so you get dilution of your drink while you chill, but not too much. Too little dilution and the drink becomes strong. Without the addition of the "element" (water) many of the strong spirits used in cocktail making never fully open up to their true flavor potential.
Too much dilution caused by small or warm cubes results in a pale, thin, watery imitation of your favorite bar's product. The ice melts so quickly that 5-10 minutes later you may not even have any ice left in your glass.
If your favorite bar cracks their own ice by hand you may be used to diamond clear sparkling shards, squares or even spheres. Sure chunky cloudy ice will keep your drink cold without over diluting but part of the authentic cocktail experience is the overall presentation and we're trying to duplicate that experience at home on the cheap right? So how do you get crystal clear ice for your home bar?
 |
| "On the rocks please!" |
Making ice at home is easier than you may think. An ice pick of any shape and size and a large, deep tupperware or paint bucket and you are in business to make large chunks of cracked ice. (I'll get into making crushed ice in another post since for this the starting shape of the ice is not important.)
Many of the top bars purchase 300 lb blocks of sculpture-grade ice made in sophisticated (and expensive) machines and carve them down into workable sizes for use in their bars. Not an easy thing to make use of at home.
There is a lot of info out there on the hows and whys of getting clear ice. My technique is derived from Camper English's "Alcademics" blog. He has done some excellent experimenting and has found that insulating the sides and bottom of the form you are freezing ice in and allowing the ice to form from the top down can greatly improve the clarity of your ice block.
I started with a cardboard box filled with packing peanuts and plastic grocery bags and made a from around a tupperware type container and covered the whole thing in duct tape.
| Empty form insulated with plastic shopping bags and packing peanuts. |
Now I can slip the container in and out easily to harvest the ice and re-fill.


Blocks half frozen with edges taken off.
If your local tap water is not working for you or you just don't want to use it, try boiling the water first. Some even swear by the double boil method but try this as last resort. I've not tried it, but normal (non-mineral) bottles water or distilled water should yield good results as well. Bringing to boil and filling when only partially cooled should do the trick.

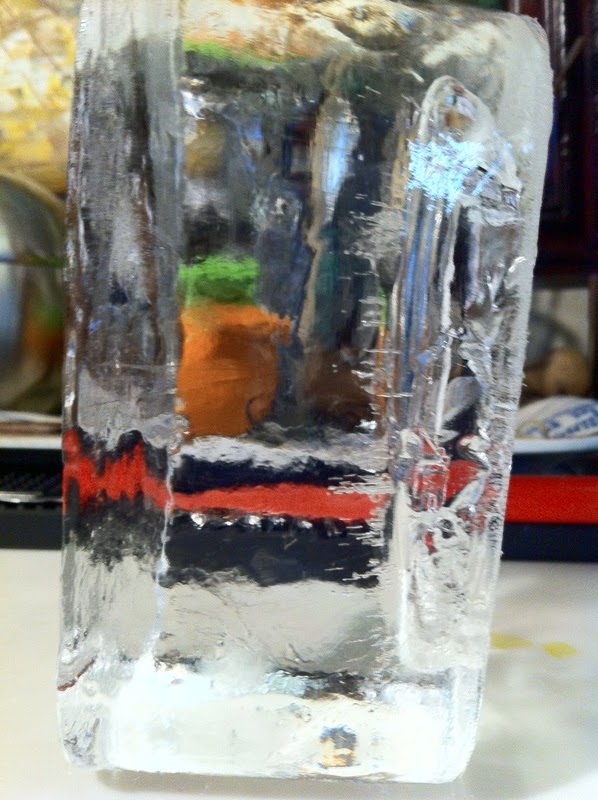
80% frozen with edges intact. Caught before "impurities" froze and expanded.
Hot water freezes faster than cold. By freezing hot water in layers from the top, the impurities that freeze last fall to the bottom. If you allow the block to freeze solid you can see these impurities in the form of cloudy ice filled with air holes. You can chip this part away to harvest the good clear ice on top (if you forget to check). Often the air pockets that form will cause the ice to practically explode off the good block of clear ice.
 |
| Fully frozen block with "cloudy" impurities at bottom. |
If you can catch the block before it freezes completely however all you have to do is let the unfrozen water at the bottom out and chip away at the sides and you are left with a very clear block of ice in a workable size. I can make 1-2 of these a day and store them away for future use. After a bit of playing around with the ice pick splitting these blocks into the shape you desire is easy and short work.
 |
| Ice scored and ready to crack. |
 |
| Clear Cracked Ice |
There you have it, clear blocks of ice for your home chipping pleasure!
No comments:
Post a Comment